Goals of Rehabilitation in Phase 1
The objectives of rehabilitation during the first 0-3 weeks post-surgery are to:
- Improve hip mobility
- Activate the muscles surrounding the hip
- Reduce pain and swelling
- Use crutches for walking throughout the entire phase
- Be able to manage daily activities within the first three weeks
Following arthroscopic surgery, the most critical phase of hip healing occurs within the first six weeks. Therefore, it is essential to follow the given instructions and adhere to the restrictions.
Restrictions
During the first three weeks, you must not:
- Rotate your hip outward more than 30 degrees
- Extend your hip beyond what is necessary for normal walking
Expect to use crutches for up to four weeks post-surgery.
Guidance on Using Crutches
Use both crutches, ensuring they move together with the operated leg. Initially, you may take smaller steps, but aim to walk as naturally as possible. Weight-bearing is permitted as long as it is pain-free.
When using stairs:
- Ascend with the unoperated leg first.
- Descend with the operated leg first.
- Support yourself on the handrail with one hand while holding both crutches in the other.
- The crutches should follow the operated leg.
Preventing Pain and Swelling
Following these recommendations will help minimise pain and swelling:
- Frequently relieve pressure from the hip by alternating between lying down, sitting, walking, and standing.
- Lie on your stomach for at least 20 minutes twice daily.
- Avoid prolonged periods of sitting in a chair.
- Apply an ice pack (e.g., a bag of frozen peas) to the hip for approximately 20 minutes as needed, especially after exercising. Always place a towel or similar cloth between your skin and the ice pack.
- Continue taking pain medication as prescribed and at regular intervals for up to 14 days post-surgery.
Resting Positions
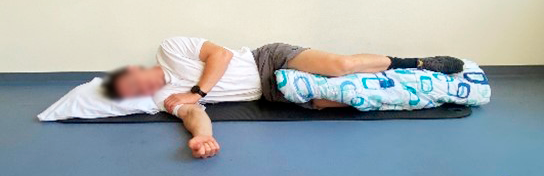 Resting Position 1: Lie on the unoperated side with your legs slightly bent and a pillow between your knees. This position reduces the weight and traction on the operated hip and muscles.
 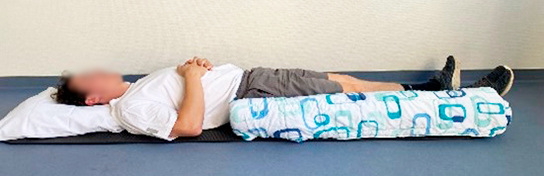 Resting Position 2: Lie on your back with a pillow placed along the outer side of the operated leg, preventing you from rolling onto the operated hip.
 Exercise Programme
During the initial three weeks of rehabilitation, it is essential to move the hip frequently to restore mobility and prevent the formation of stiff and restrictive scar tissue around the hip joint.
Exercise Bike
It is recommended to exercise on a stationary bike / exercise bike. The bike should be adjusted so that there is no or minimal resistance. Use the bike at a relaxed to normal pace, for 15-20 minutes twice daily, starting the day after surgery. You should remain seated throughout the entire exercise. Adjust the saddle to a slightly higher position than usual. Use the unoperated leg to pedal and let the operated leg simply follow through the motion. Your gears or resistance should be adjusted to provide appropriate resistance, ensuring the movement is controlled and consistent.
Exercises
Perform exercises 1-2 times daily. Complete three sets of 10 repetitions for each exercise (Exercises 1-9).
Exercise 1 - Supine Hip Flexion with Foot on the Floor
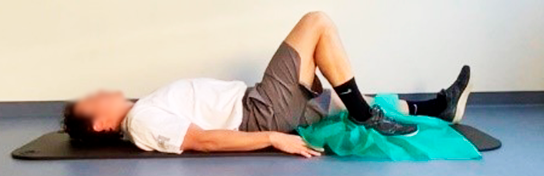
- Lie on your back with your legs extended.
- Bend the operated leg at the hip, sliding the heel along the floor towards your buttocks.
- Slowly return to the extended position.
- Use a sliding sheet under your foot for smoother movement.
Exercise 1a - Hip Flexion Overpressure
- Finish each round of "Exercise 1" by gently pulling the knee as close to the chest as possible. Stop when the pain reaches 4 out of 10, and return to the neutral position as described in "Exercise 1."
Exercise 2 - Lying Internal Rotation with Extended Leg
- Lie on your back with your legs extended.
- Rotate the foot of the operated leg inward as far as possible.
- Then rotate it outward. Be aware: the maximum allowed outward rotation for the right leg is "2 o’clock," and for the left leg is "10 o’clock."
Exercise 3 - Glute bridge / Pelvic Lift
- Lie on your back with your knees bent.
- Engage your lower abdominal muscles and squeeze your glutes to activate them, lifting your pelvis into a bridge position and extending the hips.
- Hold for 3-5 seconds.
- Slowly lower back down.
Exercise 4 - Activation of Hip Adductors / Inner thighs
- Lie on your back with knees bent and a ball or similar object between your knees
- Squeeze the knees together and hold the contraction for 5 seconds
- Aim for approximately 70-75% of maximum effort
Exercise 5 - Deep abdominal activation with external rotation to 30 degrees
- Lie on your back close to a wall
- Bend your knees and place your feet flat on the floor, near your buttocks
- Place two fingers on the inside of the pelvic rim on both sides
- Engage your lower abdominal muscles by pressing your lower back down towards the floor
- Maintain normal breathing throughout the exercise
- Slowly move one leg out towards the wall and then return to the starting position
Exercise 6 - Seated activation of abdominal muscles and quadriceps
- Sit upright with thighs fully supported
- Engage your lower abdominal muscles by drawing your navel inwards.
- Extend one leg at a time
- Maintain a straight back and avoid rounding the spine
Exercise 7 - Standing hip extension
- Stand with support from a chair, as shown in the picture. Place the operated leg on a sliding sheet
Perform the following two movements:
- Slide your foot forward and backward while keeping your toes on the floor. The heel is allowed to lift off the floor
- Slide your foot outward and then return to the starting position
Exercise 8 - Standing weight shifts
- Stand with the operated leg in front, with the weight on the back (unoperated) leg
- Contract the glute of the operated leg and shift weight forward onto it
- Shift weight back again.
- Be aware: ensure that you do not internally rotate the knee (or the hip), drop the hip, or lean the torso sideways.
Exercise 9 – Hip flexor stretch
- Lie on your back with your operated leg straight/extended and your unoperated leg bent towards your chest.
- Hold the knee of your unoperated leg with both hands placed just below the kneecap and gently pull it towards the centre of your chest.
- You should feel a stretch at the front of your operated hip (or at the base of your torso, where the leg begins).
- Hold for about 30–40 seconds.
Get the information on your phone
 Scan the QR code to access the exercises on your phone.