Important information and management
Pain
Pain is a normal part of the healing process. It is common to experience pain for a few weeks, which may affect your sleep, knee movement, and walking ability. It is very important that you take the pain-relieving medication prescribed to you, not only to reduce pain but also to help the healing processes and to restore normal movement in your knee.
Swelling
Your knee will likely be very swollen the first week after the injury; this is part of the inflammatory (healing) process. The swelling may continue for several weeks, but gradually decreasing over time. This healing phase can affect your ability to regain full knee movement and activation of the muscles at the front and back of your thigh, therefor it is normal, that there are less function and more pain the first period after the operation.
It is important to try to reduce the swelling, by elevating your leg above heart level several times a day for 15–20 minutes each time. Wiggle with the ankle is also helping the leg to be less swellen.
You may also use an ice pack and compression (such as a Tube Grip) to help control pain and swelling.
Movement and Exercise
Movement and exercise are crucial for your recovery. The exercises in this program are designed to get your knee moving again and improve your thigh muscle strength. You should aim to do the right amount of activity - not too much or too little – talk with your physio about how you manage the use and the progresses.
NB! We have the experience that some people do too few exercises and rely only on walking for their training. This is not ideal, as too much walking may overload your knee, preventing the reduction of swelling, which will delay healing and increase pain and stiffness.
Bracing:
You will be measured for a Jack Brace, which will be provided and fitted at the start of your specialised rehabilitation with a physiotherapists in the orthopaedic outpatient group.
You must wear the Jack Brace 24 hours a day. It is important to get the best and a good result. The typical duration for wearing the brace is 12 weeks. The orthopaedic surgeon will assess during outpatient follow-up whether the bracing period needs to be extended.
It is essential for the success of your treatment that you understand the importance of wearing the Jack Brace 24 hours a day and not removing it during the day or night.
The brace should be applied as soon as possible after your injury, once you have been referred by an orthopaedic surgeon (should be within 2–4 weeks after the accident).
The tension on the Jack Brace should be set as high as possible, but at a minimum of 7, provided you can fully straighten your knee to 0 degrees without experiencing pain at the front of the knee.
If the brace does not start at maximum tension (15), the tension should be increased gradually over the 12 weeks. Your physiotherapist will instruct you on how to do this correctly.
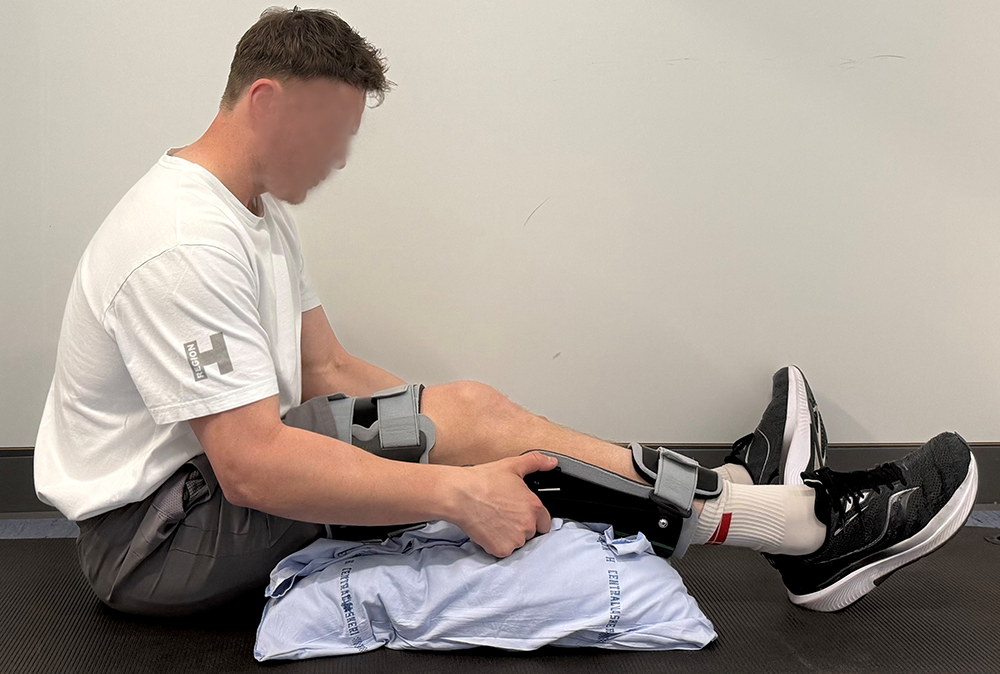
You must not loosen the brace at the lower part near the shin. When removing the brace to change clothes, always do so with your lower leg resting on a pillow before turning the tension off. Do you have clothe with can be dressed without the need to take the brace of, we recommend that.
Crutches:
Use crutches as needed to reduce weight bearing and minimise pain and swelling around the knee and lower leg.
Range of Motion Restriction:
0–120 degrees. The brace must not be set to hyperextension (-10 degrees).
No hyperextension for 12 weeks!
Stair Walking:
Both up and down, use handrails and 1–2 crutches if needed initially.
Other Treatments:
Electrical muscle stimulation may be used to activate the VMO muscle (Phase 3 after removing the Jack Brace).
Occlusion training (blood flow restriction) may supplement your training (Phase 1 with Jack Brace on).
You may experience pressure marks or skin irritation on the lower part of the shin from the inside of the brace. Tube Grip usually helps relieve this effectively – ask your physio for this.
Important Precautions:
- Avoid overstretching your knee for 12 weeks.
- Avoid resistance exercises targeting the hamstring muscles for 12 weeks.
- Avoid kneeling for 12 weeks.
12 weeks program for rehabilitation/training (conservative)
Phase 1: week 0 - 6
Goals of rehabilitation:
- Protect the healing of the posterior cruciate ligament (PCL)
- Minimise pain and swelling – control the degree of inflammation by load management.
- Achieve free patella mobility
- Gradually increase knee range of motion
- NO hyperextension of the knee
- Activate the vastus medialis obliquus (VMO) muscle to minimise muscle wasting (atrophy) in the quadriceps and surrounding muscles.
- NO training of the hamstring muscles.
Patella Mobilisation
- Sit on the floor with your knee slightly bent, resting on a pillow or a rolled-up towel.
- Use both hands to gently push your kneecap from side to side, encouraging sideways movement.
- Then, use the palms and fingers of your hands to gently push the top and bottom of your kneecap, promoting an up and down motion.
- Move your kneecap in each direction for about 20 seconds and repeat 5 to 10 times per direction. You can also include diagonal movements.
This exercise helps prevent reduced mobility and stiffness in the joint between the kneecap and the thigh bone, as well as the shin bone. Reduced movement in this joint can lead to pain and generally decreased knee mobility.
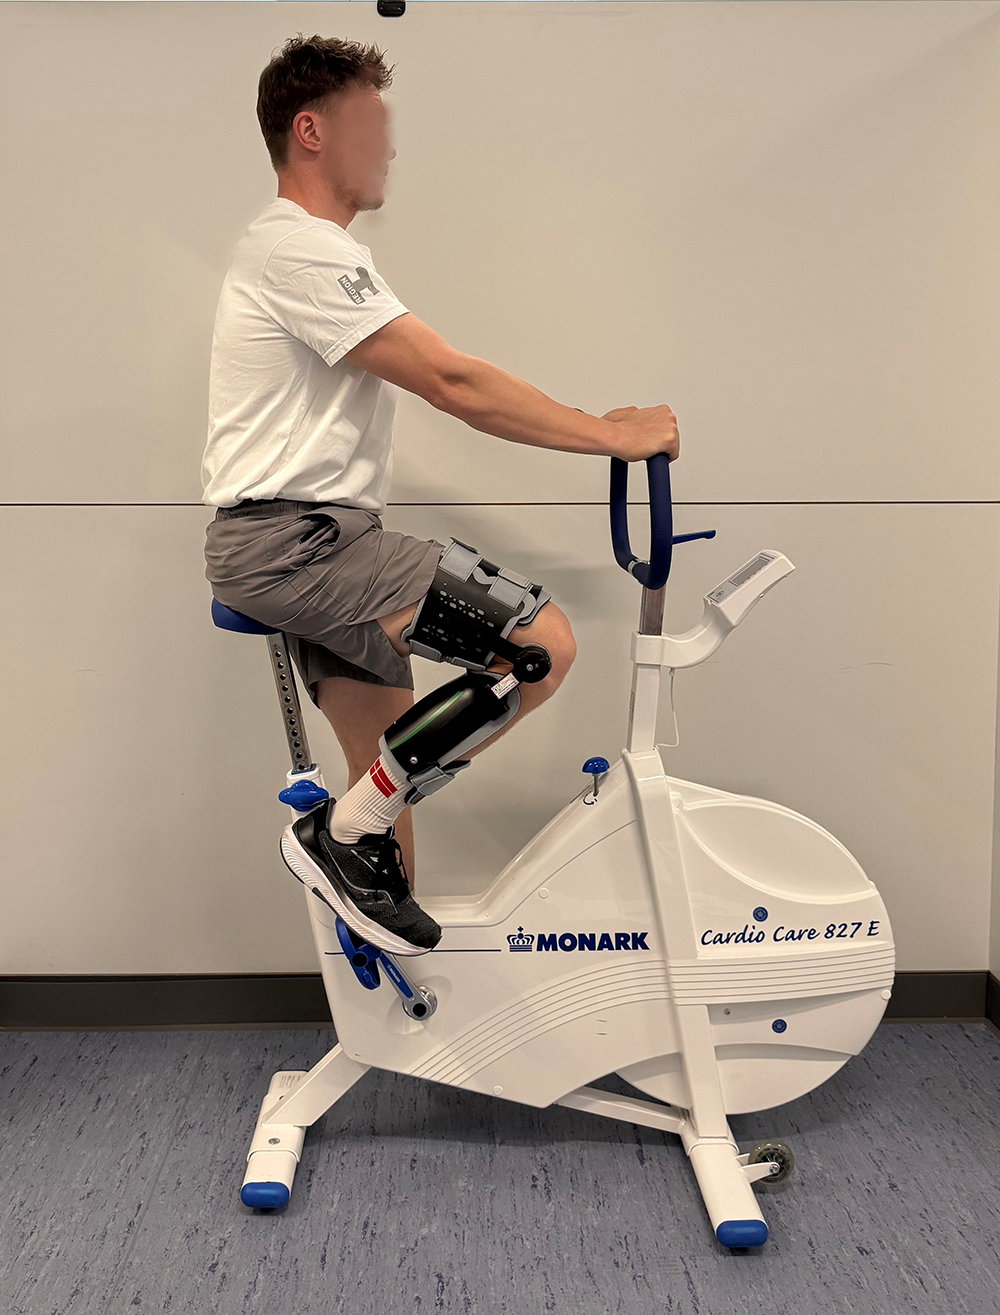
Exercise 1 - Cycling on a stationary bike with the Jack Brace and a high saddle without resistance.
2 sessions of 20 minutes daily.
Exercise 2 - VMO activation with the knee slightly bent.
- Sit on the floor. Use either a foam roller or roll a towel into a cylinder and place it in the crease behind your knee.
- Lift your lower leg and straighten your knee.
- You should feel the front of your thigh tighten.
- Hold the knee straight for 5–10 seconds, then slowly lower the leg.
- Repeat 10–15 times.
Exercise 3 - Seated knee bends/extensions with a cloth under the foot.
- Sit upright on the edge of a chair
- Place a cloth under your foot, and use it to assist bending and straightening the knee
- Bend your knee as far as possible while wearing the Jack Brace.
- Hold the end positions for about 5 seconds.
Perform 10–15 repetitions, 3 times, with a 60-second rest between sets.
Exercise 4 - VMO activation seated on a chair (soft heel on shoe).
- Sit upright on the edge of a chair and place a rolled yoga mat under your foot.
- Press the heel gently down into the mat so you feel the inner thigh muscles contract.
Perform 10–15 repetitions, 3 times, with a 60-second rest between sets.
Exercise 5 - Prone straight leg raises.
- Lie flat on your stomach with your arms stretched above your head.
- Lift one arm and the opposite leg straight off the floor, then slowly lower them back down.
Repeat with the opposite arm and leg. Perform 10–15 repetitions, 3 times, with a 60-second rest between sets.
Exercise 6 – Side-Lying Straight Leg Lifts
- Lie on your side with the leg wearing the Jack Brace on top.
- Roll slightly forward, so the hip of the upper leg is positioned a little further forward than the hip you are lying on.
- Lift your leg slowly upwards and backwards, then lower it back down with control.
- Keep your hip extended throughout the movement and avoid arching your lower back.
- You should feel fatigue in your gluteal muscles.
Perform 10–15 repetitions, 3 times, with a 60-second rest between sets.
Exercise 7 – Side-Lying Inner Thigh Raises
- Lie on your side with the leg wearing the Jack Brace on the bottom, resting against the floor.
- Bend your healthy leg forward for support.
- Lift the bottom leg straight up and down with a slow, controlled movement.
- You should feel fatigue in the muscles on the inside of your thigh (adductors).
Perform 10–15 repetitions, 3 times, with a 60-second rest between sets.
Exercise 8 – Abdominal Muscle Exercises (Rectus and Oblique Abdominals)
- Lie on your back with your knees bent and hands on your head behind your ears
- Engage your lower abdominal muscles to stabilise your lower back
- Bring your elbow up towards the opposite knee
- Slowly return to the starting position.
Perform 10–15 repetitions, 3 sets, with a 60-second rest between sets.
Exercise 9 – Straight Leg Raise (SLR) when you are able to keep the knee locked in 0 degrees extension while lifting it off the surface
- Lie on your back
- Engage your lower abdominal muscles to keep your lower back stable
- Tighten the muscles in the front of your thigh to fully straighten your knee, then lift the whole leg and hold for 2–3 seconds
- Slowly lower the leg back to the starting position with control.
Perform 10–15 repetitions, 3 sets, with a 60-second rest between sets.
Exercise 10 – Neuromuscular Training Level 1
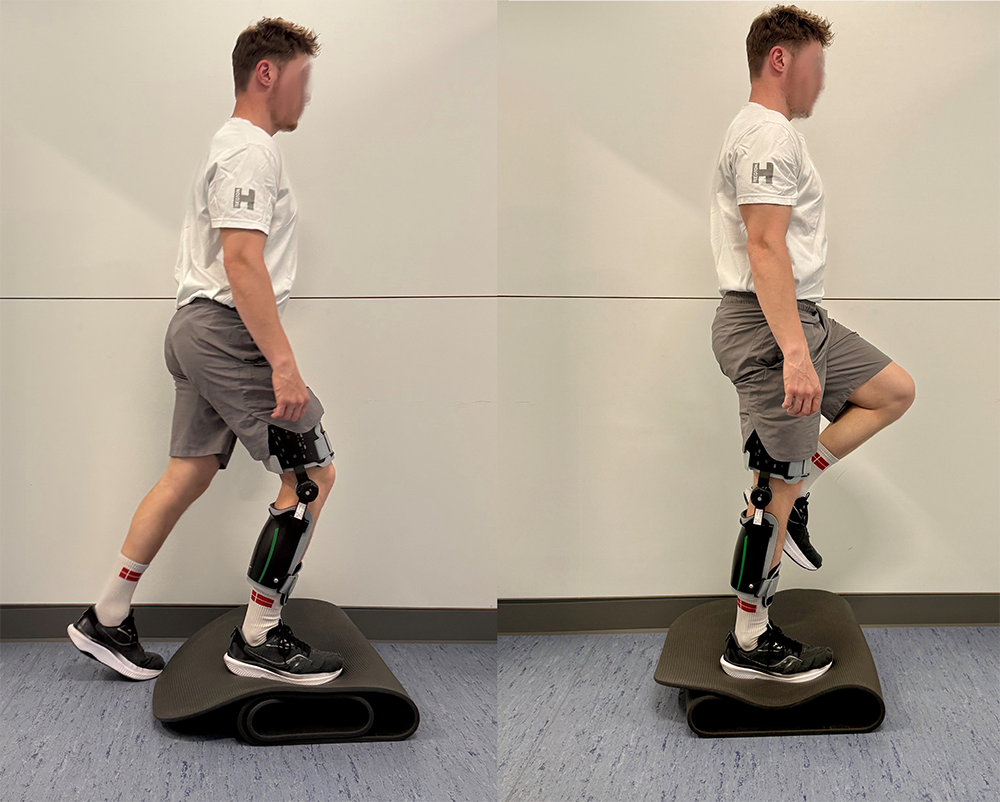
- Fold a yoga mat and place it on the floor. You may also use a large towel folded several times or another surface that is unstable. Make sure to put something underneath it to prevent slipping and reduce the risk of falling
- Stand in front of the mat and step onto it with the leg wearing the Jack Brace, lifting your non-operated leg off the surface
- Maintain your balance for 10 seconds before stepping down.
Perform 10–15 repetitions, 3 sets, with a 60-second rest between sets.
Phase 2: week 7 - 12
Rehabilitation Goals:
- Protect the healing of the posterior cruciate ligament (PCL)
- Minimise pain and swelling – control the level of inflammation
- Achieve 0-120 degrees range of motion (ROM) in the knee joint (maximum ROM allowed by the Jack Brace)
- Continue to avoid any hyperextension
- Activate the vastus medialis oblique (VMO) muscle, minimising atrophy of the quadriceps and surrounding muscles
Exercise bike
Cycling with the Jack Brace on a stationary bike with a high saddle. Gradually increasing resistance is allowed from week 7. Talk with you physio. The cycling should be without pain.
1-2 sessions daily, 20-25 minutes each
Exercise 1 – Shallow Squat to Maximum 70 Degrees Knee Flexion
- Stand with your feet hip-width apart and both arms along your body.
- Bend your knees to a maximum angle of 70 degrees (as shown in the image) and lift both arms in front of your body.
Perform 10-15 repetitions, 3 sets, with a 60-second rest between sets.
Exercise 2 – Step Up on Low Step, VMO Activation
- Stand in front of a step, a low box, or the bottom step of a staircase
- Step up with the leg wearing the Jack Brace and bring the opposite foot alongside it
- Step down with the same leg you stepped up on
Perform 10-15 repetitions, 3 sets, with a 60-second rest between sets.
Exercise 3 – Weight Transfer with Straight Knee
- Stand as shown in the image with the leg wearing the Jack Brace in front
- Start with your weight centred on the front foot and then shift forward onto the toes of the rear foot by rising onto the toes
Perform 10-15 times, 3 sets, with a 60-second rest between sets.
Exercise 4 – Neuromuscular Training Level 2
- Fold a yoga mat and place it on the floor. You may also use a large towel folded several times or another surface that is unstable. Make sure to put something underneath it to prevent slipping and reduce the risk of falling
- Stand in front of the mat and step onto it with the leg wearing the Jack Brace.
- Lift the opposite leg towards your abdomen, maintaining your balance for 10 seconds before stepping down
Perform 10–15 repetitions, 3 sets, with a 60-second rest between sets.
Exercise 5 – Pelvic Bridge with Both Legs Supported
- Lie on your back with both legs resting on a large exercise ball (approximately 65 cm diameter) or a chair
- Place your arms by your sides
- Squeeze your glutes and lift your pelvis off the ground
- Avoid arching your back or using your lower back to lift.
Perform 10-15 repetitions, 3 sets, with a 60-second rest between sets.
Exercise 6 – Seated Straight Leg Raise
- Sit on a chair with your back against the backrest
- Tighten the muscles at the front of your thigh to keep your knee straight
- Lift your leg above horizontal and slowly lower it back to the starting position with control.
Perform 10-15 repetitions, 3 sets, with a 60-second rest between sets.
Exercise 7 – Deadlift with Straight Knees (Both Legs)
- Stand with your feet hip-width apart holding a kettlebell in your hands
- Slowly lower the kettlebell towards the floor, keeping your knees straight.
- Return to the starting position.
Perform 10-15 repetitions, 3 sets, with a 60-second rest between sets.
Exercise 8 – Standing Double-Leg Calf Raises
- Stand in front of a chair with your feet flat
- Raise your heels to stand on your toes, hold for 5 seconds, then lower your heels back down.
Perform 10-15 repetitions, 3 sets, with a 60-second rest between sets.
Exercise 9 – Single-Leg Balance
- Stand on one leg and maintain your balance for 10 seconds
- To increase difficulty, gently turn your head from side to side or swing your arms by your sides while balancing.
Perform 10-15 repetitions, 3 sets, with a 60-second rest between sets
From Week 8:
Leg press up to a maximum of 70 degrees knee flexion, with feet placed low on the plate.
Perform 3 sets of 20 repetition maximum (RM) with progressive weight increase and decrease in repetitions.
Stair climbing is allowed, provided good quadriceps muscle control is achieved (often before 8 weeks).
Phase 2: week 13 - 18
Rehabilitation Goals:
- Aim to discontinue the Jack Brace after week 12
- Full return to activities of daily living (ADL)
- Normal stair climbing and walking
- Outdoor cycling
- Regain lost muscle strength and endurance in the lower extremities
- Begin jogging/light running programme
Restrictions: The use of the Jack Brace is stopped. The brace regimen has been discontinued.
Driving: Allowed when there is sufficient strength to fully press the pedals; insurance companies typically require the brace to be discontinued first
Cycling: Outdoor cycling permitted once the Jack Brace has been discontinued
Swimming: Front crawl allowed from week 12; breaststroke allowed from week 16
Running: Allowed when strength and stability are symmetrical, but no earlier than 4-6 months post-op; start with running up stairs
Restriction Lifted:
Isolated hamstring training now allowed
Graduated Running Programme:
- Begin with 1 minute running followed by 4 minutes walking (1:4 ratio) for a total of 20 minutes
- Increase running time by 1 minute while reducing walking time by 1 minute (2:3 ratio), continuing to 20 minutes over 5 weeks
- Once the running programme is completed, progress to exercises involving change of direction
Exercise 1 – Squat Progression (beyond 70 degrees of knee flexion)

Begin squats beyond 70 degrees of knee flexion, progressing through the phase towards single-leg training when possible, or squats with increased load using dumbbells or weighted bags.
- Stand with feet hip-width apart and arms extended in front.
- Squat to a knee bend beyond 70 degrees, up to 120 degrees allowed by the Jack Brace.
Perform 10–15 repetitions, 3 sets, with 60 seconds rest between sets.
Exercise 2 – Leg Press Progression (beyond 70 degrees of knee flexion)
Start leg press beyond 70 degrees of knee flexion, progressing towards single-leg training.
- Adjust backrest as shown, sit with feet placed on the plate at indicated height.
- Straighten knees to move body away from plate, then bend to return.
Perform 10–15 repetitions, 3 sets, with 60 seconds rest.
Exercise 3 – Pelvic Bridge with Knee Flexion, Progressing through Niveaus
Level 1:
Lie on back, knees bent. Engage lower abdominals, squeeze glutes, lift pelvis to extend hips. Hold 3–5 seconds, lower slowly. 10–15 reps, 3 sets, 60 sec rest.
Level 2:
Lie on back, knees bent, feet on wall. Leg with Jack Brace on floor, healthy leg on wall. Engage lower abdominals, squeeze glutes, lift pelvis. Hold 3–5 seconds, lower slowly. Alternate sides.
Level 3:
Lie on back, knees bent. Extend leg without brace, engage glutes, lift pelvis stable for 2–3 seconds, lower. 10–15 reps, 3 sets, 60 sec rest.
Exercise 4 – Single-Leg Deadlift
Stand on leg with Jack Brace. Hold kettlebell, slowly lower towards floor. Return to start.
10–15 reps, 3 sets, 60 sec rest.
Exercise 4 Continued – Neuromuscular Training Level 2
- Fold a yoga mat and place on floor. Stand in front and step on it with leg wearing Jack Brace, lift opposite leg to abdomen.
- Maintain balance 10 seconds, then step down. 10–15 reps, 3 sets, 60 sec rest.
Phase 4 (Week 19 onwards):
- Sport-specific training
- Higher intensity strength training (“high load”) with fewer reps (3 sets of 8)
- Return to contact sport when strength reaches 85% of unaffected leg in functional and strength tests
Training can be in community programmes or with private physiotherapists.
Get the information on your phone
 Scan the QR code to get the information on your phone.